We've put together our Top-Ten Tips to help you with some of the things we get the most questions about, and which will reduce your risk of crashing after you pass your test.
 The Driver & Vehicle Standards Agency (DVSA) have their own 'Top-Ten' - their list covers the main reasons why people fail their driving tests. Click here for the top ten fails information on the .gov.uk website.
For 100's more tips and lots of valuable advice about learning to drive and avoiding the DVSA Top Ten fails, subscribe to the DriverActive Learn Online Course to speed up your progress towards passing the driving test.
If you are teaching your kids - or helping them with home practise between lessons, the advice in the DriverActive Course will help you keep on track - and refresh your own driving skills!
We have chosen seven things that can lead to test failures or lack of confidence and three that can cause serious issues after passing your test.
We cover just about everything from getting into the car to passing the driving test in the 38 online lessons in the Learn Online Course - Just £3.99 for six months (that's only 10.5 pence per lesson!) or £2.99 for three months. Learning about things before you do your lessons can save time in the car – you can learn quicker and better!
Aim for what you want to hit!
Your first response to the statement above might be, "I don't want to hit anything!"
But.
When we look at things, we get drawn towards them. If you look at the obstacles in the road, you will be far more likely to hit them!
Virtually all steering problems are related to observation - when learners look in the wrong place.
By looking well ahead and keeping your eyes moving, you will gather information about your surroundings and the road ahead. This is essential for effective steering control.
When steering between parked cars or through other narrow gaps, keep looking well ahead and aim for the clear space you want to drive into. If you look ahead and steer early, you will always be on the right course. You don't need to look at the obstructions (parked cars, etc.) to avoid them.
Think of it like throwing a dart or shooting an arrow from a bow. You aim early, and the arrow goes where you want it to without deviation.
New drivers often have problems when turning right. This is because they are looking in the wrong place!
The natural tendency is to look at the end of the bonnet or directly in front of the car, but you should be looking through your driver's door window.
Look out of your side window along the road you are turning into when you start to steer. As your head or eyes move back towards the front, move the steering wheel with them. (When you keep looking well down the side road, your eyes will naturally move back to the windscreen as the car moves around the corner)
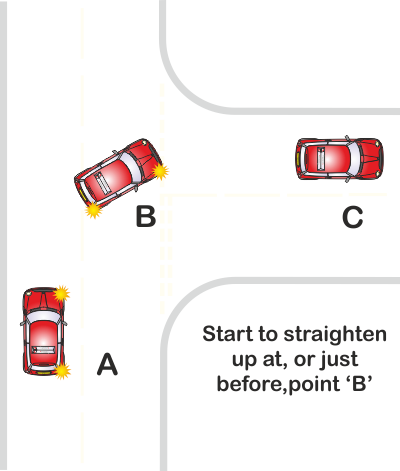 On the diagram, the driver starts to steer at point 'A'. At this point, observation should be through the driver's door window, towards point 'C'.
At point 'B', the driver's head will be moving back to the front as the view of point 'C' is moving from the driver's door window to the windscreen.
As the driver's head moves, the wheel should also move (gently) to straighten up the car. Although the car is still at an angle across the road at point 'B', the front wheels are pointing towards point 'C'.
Drivers who do not 'Look at what they want to hit' (point 'C') will usually straighten up late or need to rush the steering, turning the wheel faster than necessary- these things can cause significant problems.
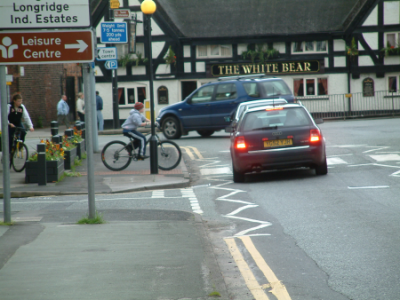
When learning to drive, there will be times when you have to make decisions but don't know what you should do.
"Do I go or should I stop?"
The driver in the picture has made a late decision to stop for the cyclist at the Zebra crossing - possibly because he wasn't paying attention, or he might have been indecisive.
If it was indecision, there is a simple remedy that you can start to apply next time you go out in the car.
There are three distinct choices that you can make in any situation ...
Stop
Go
Don't know
If it's obvious that the road is clear, you go. If it's obvious that it's not clear, you stop.
What might not be so obvious is that it's also perfectly OK to 'don't know'.
When you are learning to do something new, like driving, it is natural that you want to get stuff right - but sometimes you won't know what to do. The good news is that 'Don't know' is what expert drivers always do. It's what keeps them alive!
Don't know means don't go, but you must take action as soon as you are uncertain, not at the last moment!
 You will know when you feel uncomfortable - this is the start of your 'don't know' situation - As soon as any uncomfortable/unsure feeling starts, take action and slow down. By slowing down, you give yourself more time to think and give other drivers more time to react.
If you find that you are going too slow or if you stop unnecessarily, you can easily start again.
If you go too fast, you might get a ride home in an ambulance - or end up with a hefty repair bill for your car.
As a general guide, as you approach any situation, ask yourself, "Is it safe to carry on?". If the answer is "Don't know", slow down and continue to slow down as you approach.
The decision is easy if you still don't know when you are about eight car lengths away from the situation (by which time you will be going very slow!). Don't go!
You will find much more information about decisions and routines in different situations in the DriverActive Learn Online Course.
This information is essential for safety while you are learning to drive, but it's also necessary for safe driving after you pass the driving test.
Next time you don't know, remember that being unsure is your brain's automatic safety warning.
As you gain more experience behind the wheel, you'll find that decisions become easier.
Remember: 'Don't know' will keep you safe during driving lessons and after you pass the driving test.
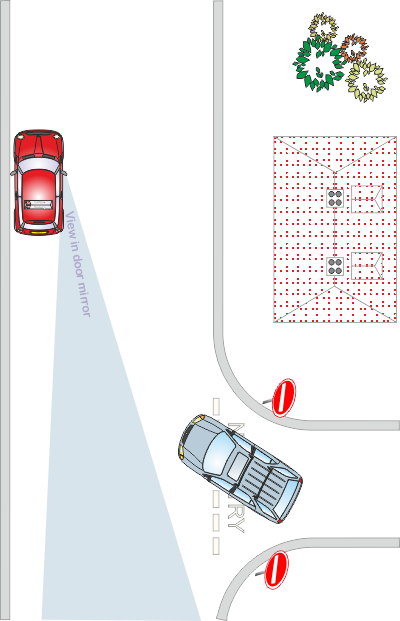
When moving off, you must always ensure it's clear and safe.
Your driving instructor will stress the importance of blind spot checks time and time again during your driving lessons. And for a good reason, problems when moving off can cause problems on your driving test and accidents after you pass.
Failing to move off safely is the UK's fifth primary driving test failure reason.
As you sit in the driving seat, you can see the front through the windscreen and side windows. Your mirrors will show you most of what's behind. But some areas around the car need special attention - places that you can't see clearly. These are the blind spots.
You will find lots more information about moving off safely in the DriverActive Learn Online course.
Remember that this information is essential not only for safety during your driving lessons and test but also for safe driving and keeping a full no-claims insurance bonus after you get a full licence.
A hazard routine is a basic drill or system of actions you use every time you approach a hazard.
A hazard is anything that causes you to change your speed or direction, for example, junctions, parked cars, animals on the road, etcetera.
By taking a systematic approach, you will be sure that it is safe to carry out any action that may be necessary to deal with the hazard safely.
The basic routine for driving in the UK is Mirrors Signal Manoeuvre, abbreviated to MSM. The full routine, however, has more letters in the sequence:
MSM - PSL - LAD.
See the steps below for the meaning of each letter.
The sequence of actions that make up this expanded Mirrors Signal Manoeuvre (MSM) hazard routine is shown in the example below. The example describes how you would use this basic routine to make a right turn (the diagram shows a car in the UK where we drive on the left)..

1. Mirrors
As soon as you recognise a hazard ahead, you must check your mirrors to see what is happening behind.
Just looking is not enough; you must ask yourself: 'Is it safe to carry out my manoeuvre?'
2. Signal
When you are sure it's safe, ask yourself if any other road users need to know what you intend to do.
If there are other road users, give the appropriate signal (by indicator, arm or brake lights).
After signalling, recheck your mirrors to find out how drivers behind are reacting to the signal.
3. Position
Check your mirrors to ensure it's safe to move into the correct position for the manoeuvre.
4. Speed and Gear
Use the footbrake (or ease of the power in an EV) to ensure you are going at a safe speed to negotiate the hazard. If you are in a manual car, allow yourself plenty of time to change gear.
If things feel rushed, you're going too fast.
Make a final observation check all around, and then complete your manoeuvre.
5. Look, Assess, Decide, and Act.
While carrying out the hazard routine, you must constantly look for other road users. Doing this will help to ensure that you have all the information you need to make the correct decisions about your dealing with whatever is ahead.
Note: We have mentioned mirrors at least three times so far - there is no set number of times to check your mirrors.
The important thing is that you MUST always know how your actions will affect the following drivers and how their actions will affect your plans. Use your mirrors as often as necessary during the routine.
Be patient about learning manoeuvres - leave them until you have fully mastered forward driving skills.
There are five slow-speed manoeuvres in the UK driving test. These are:
Moving off at an angle from behind a parked vehicle
Reverse (parallel) parking
Reversing into a parking bay
Driving into a parking bay and reversing out
Stopping on the right and reversing in a straight line
You don't have to do all these manoeuvres in your test, but you won't know which you will get until you are in the car with the examiner.
In addition to the manoeuvres listed above, examiners can also ask for an 'emergency stop' or uphill start (or both) in some tests.
The reason for being patient and leaving the manoeuvres until you have mastered the skills of controlling the car and making good decisions about other road users is that they will be easier, and you will learn them quicker.
If you start your manoeuvres too early, you will waste valuable driving lesson time and money and also risk becoming de-motivated if you find yourself struggling.
A logical order for learning manoeuvres:
Hill starts. Learn these early on as soon as you have mastered moving away on a level road
Emergency stop. Learn this as soon as you have mastered basic control skills - before tackling traffic while you are still learning on quiet estates or similar.
Angle starts. These are a natural progression from moving off - perhaps on your third or fourth lesson.
Straight reversing. This can also be learned early - before starting to tackle traffic.
Parking on the right - with straight reversing. As a more complex manoeuvre, this can be tackled on quiet roads as soon as you are driving in traffic (perhaps around 12 to 15 hours training)
Additional manoeuvres
Although dropped from the driving test in 2017, we recommend learning to turn around using the 'three-point-turn' method. Also, to reverse into openings on the left and right (for example, reversing around a corner).
There have been occasions where the road was blocked during a driving test. If this happened in your test, you would only be able to proceed if you could turn the car around safely.
You won't need to spend much time on these manoeuvres if you leave them to a week or two before your test – you should be able to achieve them successfully on the first or second attempt. The bonus is that they will also 'toughen up' your general slow manoeuvre skills, especially observation (which is a major cause of test failure).
This example shows why complex manoeuvres are best late until you have had lots of learning experience (between 20 and 30 hours). Other complex manoeuvres include parallel and bay parking and reversing into openings. Although it's no longer in the test, we've chosen this example because it needs skills common to all slow-speed manoeuvres.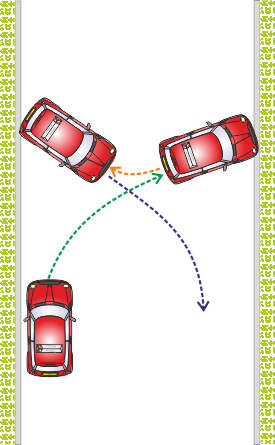
The 'Turn-in-the-road' manoeuvre needs all of the following skills:
Clutch control
Reversing
Moving off on a slope
Accurate steering
Angle Starts
Coping with traffic
If you don't have these skills, you can spend too much time and waste money practising.
The skills for the turn-in-the-road break down as follows:
(Manual car) Clutch control can be learnt as a specific exercise early in training, but it needs to be 'second nature' before you attempt this turn.
In an automatic or EV, you need to learn slow speed control early in training.
This is not a good manoeuvre for learning to reverse – when you are broadside across the road with traffic approaching! Reversing skills need to be mastered beforehand.
Moving off on a slope is required because of the 'camber' of the road.
Accurate steering will be have been mastered when you can successfully turn right into or out of a narrow road.
Angle-starts will help you coordinate slow-speed manoeuvring with observation (all cars) and (additionally) clutch control and steering in a manual car.
The ability to cope with traffic (learned at crossroads and in narrow streets with parked cars) is essential to deal confidently with vehicles that approach during the turn.
 You are the odd one out when doing low-speed manoeuvres. That is, you are the one who is doing something out of the ordinary and getting in the way of other people.
As a general rule, drivers should always give way to pedestrians, especially those at the most risk (the old, young and infirm). But you must also give way to anyone else who is not giving way to you!
When you do slow-speed manoeuvres, keep a good lookout, especially in your 'blind spot' areas. Just like an OWL!
Think about how an owl can turn its head almost all the way around. Apply the same principle of Observation Without Limits when doing manoeuvres and you shouldn't miss anything (you won't hit anything either!).
This advice will help to ensure that you are always confident about hill starts if you are driving a manual car!
Hill starts in electric cars and other automatics will always be easy. In fact, they are so easy, they don't need an explanation here.
This method is for cars with conventional 'lever' handbrakes. Many manual cars have electronic handbrakes, hill-start assist or a 'brake hold' feature - just as in automatics, these things make hill starts easy with no explanation needed (although we explain these features in the DriverActive Learn Online Course.)
The trick is to use the handbrake as a 'safety lever' to prevent the car from rolling back while you adjust your feet during an uphill start.
When new drivers have a problem starting on hills, they are often worried about rolling back. If the car moves back, even a little bit, they 'panic' and start tap-dancing with the pedals!
But the reality is that if you can move off OK on a level road, you already have all the skills you need to move off up a hill.
Using this method, you will only adjust your feet on the pedals when the car is safely secured with the handbrake.
Start by preparing the car. Select first gear and press the gas pedal (accelerator) so the engine makes more noise than it does for a flat road start. Next, bring the clutch up to the biting point (the point where the engine starts to connect with the wheels). Now keep both of your feet still!
Make your usual safety checks (look all around and use your mirrors) and then release the handbrake very gently - no more than a few millimetres. Keep your feet still if the car starts to move (back or forward), and pull the handbrake back on.
Re-adjust your feet while the car is secured with the handbrake, double-check that the road is still clear, and then try again, releasing the handbrake a few millimetres.
 Repeat the process above until you can release the handbrake, keeping your feet still, without the car moving. You now have full control. Easing the clutch up will move the car forward, and gentle pressure on the clutch when the car starts to move will be sufficient to stop it.
Using this method, you will feel secure in the knowledge that you can't roll back more than a couple of centimetres at the very most. With practise, you will find that you soon get the right 'feel' for the clutch every time and that you won't need to pull the handbrake back at all - it's simply a matter of confidence.
You will find more information about hill starts and moving off generally in the DriverActive Learn Online course.
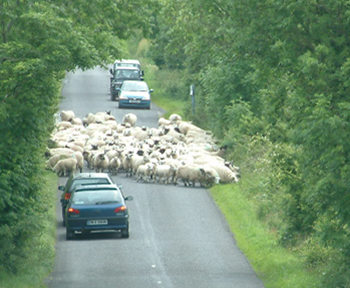
The most common cause of accidents is a lack of space between vehicles and excessive speed (5mph can be too fast in some situations).
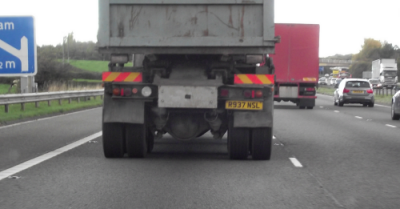 You owe it to yourself and your passengers to keep a safe gap between you and the vehicle in front.
Whether driving or in the passenger seat, if your view is something like that shown in the photo - it's only a matter of time before the crash.
The easiest way to judge a safe gap is to use the two-second rule.
Keeping a minimum of a two-second time gap in front of your vehicle will create space and time to react to emergencies. You should double this gap in wet weather or on poor road surfaces. Two seconds is the minimum gap. The longer the gap, the bigger your safety margin.
Read the news and watch TV, and you will see stories about accidents in which people are killed and injured. Look around, and you will notice that many drivers never leave a big enough gap, especially in poor weather conditions. Coincidence?
Try holding your hand about two inches in front of your eyes and consider what you can see directly in front of you. (Not while you are driving!)
Now, keeping your hand in front and in line with your eyes, gradually move it away and notice how your view of the world in front is changing.
If you now apply the same principle to large vehicles, you will find that by keeping well back, you have a wider field of view ahead. This is one of the reasons that drivers are advised to leave a 'two chevron' gap on specially marked sections of motorways.
Quite often, drivers who follow too close to large vehicles miss opportunities to overtake simply because they can't see far enough ahead.
By keeping well back, you will be in a much safer position to overtake, and as a result, you will probably complete your journey quicker.
Sometimes, either during your driving lessons or after you have passed your driving test, you will feel tired in the car. If this happens, follow the advice below.
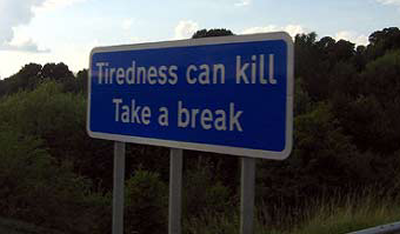 On some roads, particularly motorways, you will see signs saying, 'Tiredness can kill - Take a break.'
At 60 m.p.h., falling asleep for just one second will mean travelling about 30 metres without control.
Try walking briskly 30 metres with your eyes tightly closed and see how it feels! (Scary)
Opening the window, turning on the air conditioning, or playing loud music can all be short-term fixes to get you to the nearest safe parking place, but they are not effective in keeping drivers alert for any time - certainly not more than five minutes.
If you feel tired, stop as soon as possible for a walk or a sleep - on a motorway, this means taking the first available exit (or service area if this comes before the next exit).
The following points are warnings of drowsiness and fatigue. Continuing to drive in this condition will put you at serious risk of being involved in a crash. Park the car in a safe place at the first opportunity and get some rest.
Can't remember the last few miles driven
Having wandering or disconnected thoughts
Experiencing difficulty focusing or keeping your eyes open
Having trouble keeping your head up
Approaching headlights dazzleing more than usual
Drifting out of your lane or hit a rumble strip
Yawning a lot
Following other traffic more closely than normal
While tiredness is more common between midnight and six in the morning, it can affect drivers at any time of day. Don't drive tired.
Stop Driving
Take a nap for at least 15 to 20 minutes
Take frequent breaks at service areas
Get plenty of sleep the night before a
long trip
Never drink and drive, this will increase tiredness
Be aware of the signs that you are tired
Take frequent breaks at least every two hours or 100 miles
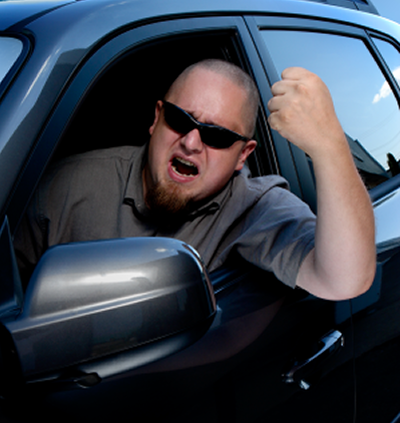
Every driving licence comes with a set of responsibilities.
As a driver, you are responsible for the safety of yourself, your passengers and other road users - you need a good attitude.
If you ever feel annoyed, ask your driving instructor for tips to stay calm (also in the DriverActive Online Course).
If another driver pulls out in front of you, put safety first. Chill out! Check your mirrors, slow down and be prepared to stop.
It might be that the other driver is a PRATT* and has moved out aggressively.
* Not being rude! It's a technical term (Person Responsible for Atrocious Traffic Trauma)
But so what?
They are the ones who look stupid, and you are safer when they are in front and clearly visible. You will see the accident but not be involved in it!
On the other hand, the other driver may have misjudged the situation and genuinely made a mistake.
None of us, no matter how experienced, are immune from mistakes. And, of course, you don't know the whole story - it could be that the other driver is rushing to the hospital to see a loved one who has been in a car accident.
If you feel uptight, take a couple of deep breaths and ease off the gas.
The other driver will be in your life for about three seconds - hardly a lifetime! But three seconds could be all that is left of your lifetime if you respond aggressively and end up in an accident – or if you get attacked by an aggressive driver (Google road rage attacks).
Avoid becoming a victim of your own road rage. Let it go.
Your tyres are your only contact with the road - bearing this in mind, you must treat them with tender loving care.
 No matter how well your driving instructor helps you to learn to drive or how quickly you pass the driving test, if your car has defective tyres, there is a real risk that you won't be behind the wheel for long.
One of the ways that you can show love and affection for your tyres is to check their pressures regularly.
Check your tyre pressures once a week (minimum) when they are cold. This means you should drive no further than your nearest garage to check them or at home before you set out.
When you drive, friction causes your tyres to heat up. This, in turn, causes the air inside to expand and the pressure to increase.
You will get an inaccurate reading if you check the tyres when they are warm (the manufacturer's recommended tyre pressures are for cold tyres).
If your car has a tyre pressure readout on the dashboard, don't ignore it! Uneven tyre pressures make vehicles unstable, especially in emergencies.
If you neglect your tyres, you run the risk of blow-outs and, consequently, an increased accident risk.
After a tyre blow-out people often say:
"It happened so quickly, there was nothing I could do!"
In reality, tyres usually take weeks or months of neglect before they burst - but sooner or later they will, guaranteed.
Ask your driving instructor to teach you how to check tyres for wear, damage and pressure (most good instructors will do this as part of a 'garage routines' lesson).
You will find more information about vehicle safety in the DriverActive Learn Online course.