If you have been following this course in sequence and getting plenty of practise, you will now have gained a range of basic control skills and will be starting to feel like a driver.
 But there are a few more basics to learn before moving on to detailed stuff about road procedures and full driving routines.
Before moving on, it is good to practice and consolidate the things you have learned so far - until they become 'second nature'.
A good way to practice is by using your new driving skills in different ways while you stick to quiet roads.
If you are learning in a manual car, this practise will develop your awareness and clutch-control skills. In automatics and electric vehicles, it will help build your awareness and develop smooth control of the accelerator and footbrake.
It might be worth considering that everyone learns at a different rate - you might be learning quicker or more slowly than your friends. Some people take a couple of years to pass the test, others do it in a few months, but the important thing is not how quickly you learn; it's about how well you learn.
There is often a temptation for new drivers to start 'running before they can walk'; this is understandable - you want to get out on the road without those L plates as soon as possible. But rushing ahead at this stage could cost you more time in the long run.
When you look at the big picture, you will hopefully be driving for the next 50 years or more - with this in mind, the few months you are spending now represents 'no time at all'. A bit of patience will get you on the road much quicker than pushing ahead too quickly and failing the test!
You can get over 100 videos in the Driving Test Success practical app, visit Driving test Success. (Google Play | App Store - (appstore practical videos available as an in app purchase in the 4 in 1 kit)
Working through this lesson and practising the skills in the car will consolidate your control skills and help get you into the habit of using the Mirrors, Signal Manoeuvre (MSM) routine.
In addition to MSM, you will be laying the foundation for some of the manoeuvres tested by the examiner.
![]() The examiner will want to see:
The examiner will want to see:
That you can move off safely both uphill and downhill
That you have the low-speed control skills to deal with a range of situations
That you use the Mirrors, Signal, Manoeuvre routine at junctions
That you can move off safely from behind a parked car
You may have already done some left turns during your lessons, but your instructor might have been helping while you concentrated on the controls.
It's now time to start taking more responsibility for your driving.
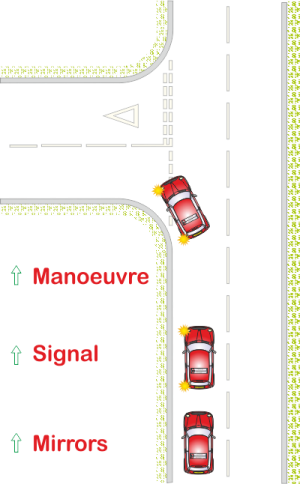
When completing quiet left turns without your instructor's assistance, you will be using the Mirrors- Signal- Manoeuvre (MSM) routine.
You might not have realised it, but you have already used the MSM routine when moving off and stopping. Here we are using a 'simple' version, but you will learn about the routine in more detail in the Road Skills part of this programme.
For now you simply need to start developing a Mirrors, Signal, Manoeuvre habit.
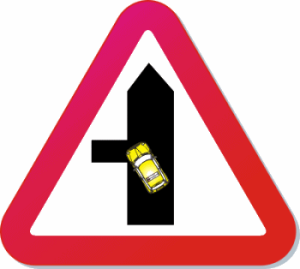
There are two main types of left turns:
From a main road into a side road (major-to-minor), where you will normally have priority.
From a side road into a main road (minor-to-major), where you will normally have to give way (yield) to other traffic.
Main roads and side roads:
The term 'major' or 'main' road has little or nothing to do with traffic volume - it simply describes the road with 'priority'. Both major and minor roads will be virtually free of traffic in quiet housing estates.
Priority:
When you have priority, other traffic should give way to you - however, this does not mean that you can ignore the actions of other road users. After accidents, you will sometimes hear drivers angrily shouting things like, "I had the right of way!"
WRONG! No one has the right of way!
Whether you are on a major or minor road, you have to drive 'defensively', allowing for the mistakes or bad driving of others. If another driver ignores a road sign and drives out in front of you, you have to try and avoid them - if you don't, you could be equally liable in any court proceedings. After all, I'm sure that you would like people to allow for your mistakes - and we all make mistakes from time to time!
As you approach a junction on the left, you first need to check your mirrors to ensure that it is safe to slow down for the turn.
It will almost always be safe to slow down; however, later on, when you drive on busier roads, the information from the mirror may affect how hard you press the brakes. You might even choose to abort the turn in an extreme situation, for example, if your mirror checks revealed a fast-moving emergency vehicle behind.
After deciding that it is safe to turn, give a signal to let others know what you intend to do.
Even though you might not see anyone else around, it's still good to give a signal at junctions because it may benefit someone around the corner (whom you have not yet seen). After signalling, recheck your mirrors to determine how the vehicles behind are responding to your signal.
Before you turn, it's a good idea to check the left door mirror (nearside mirror) to ensure no cyclists are trying to pass on your left, particularly when driving in slow-moving traffic.
Take care if there is a cyclist in front of you before you turn - never try to 'cut across' them. Hang back and allow them to pass the junction before you turn. You must also be prepared to give way to pedestrians. (Highway Code Rule 170).
When turning out of a side road, the routine is the same - Mirrors, Signal Manoeuvre.
Mirrors: Check your mirrors to make sure it's safe,
Signal: Signal in good time to help other road users.
Final mirror check: Recheck your mirrors before turning, particularly for bicycles on the left. This check is crucial when emerging because you might be stopped for a while waiting for a gap in traffic, giving cyclists to catch up.
Manoeuvre: Because you will not have priority when 'emerging' from a minor road you, must always be prepared to stop.
If you are practising on quiet roads, it might be easier for now to stop every time you approach but aim to do it in a specific way. Use the footbrake to make the car feel as though it's going to stop too early, but then just before it stops (one or two car lengths before the junction), ease off the brake. In a manual car, this is the point at which you press down the clutch to 'roll' the last few metres (a 'controlled roll'). This approach to braking will create plenty of time to check that the new road is clear regardless of the type of car you are driving (manual, auto, hybrid or electric).
You might want your instructor to prompt you about your speed, routines and control at this stage, but the more you can do for yourself, the quicker you will learn. The trick is to give yourself plenty of time by slowing down.
Initially, you might be slowing down a bit too much, but that's OK - as you gain skill and confidence, the speed will increase. Getting it right is much more important than getting it quick!
It's vital to tackle only those turns you can cope with and stick to quiet roads where you won't inconvenience other drivers - if you feel 'out of your depth', slow down and ask your instructor to take you to a more manageable location.

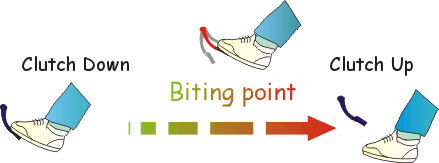
The term 'clutch-control' refers to the use of the clutch during low-speed manoeuvres, such as creeping out for a better view at junctions, reversing, parking or similar situations.
You have already used clutch-control when moving off - but before going any further, you need to practice using the clutch until it comes naturally.
We need clutch-control for slow manoeuvres because the two slowest gears, first and reverse, still allow the car to move a bit too fast when the clutch is fully engaged.
By 'slipping' the clutch, you can 'coax' the car into moving very slowly - just centimetre-by-centimetre if necessary.
To achieve good clutch control you might need to be patient at first!
It takes time to get the 'feel' for the clutch and for your muscles to tune themselves to the clutch control action.
You can only use clutch-control when either first or reverse gears are selected. In higher gears, you can change down if you need to drive slower. Keeping your foot on the clutch in higher gears causes excessive wear and tear and reduces your control.
Press the gas pedal gently (this can help smooth clutch-control and make the task easier - even in cars that will move without any gas, for example, diesel-engined cars)
Bring the clutch up smoothly to the biting point (the point at which the clutch starts to engage)
Hold both feet still
Release the handbrake
If the car moves, put a little pressure on the clutch - this will stop the movement (unless you are facing downhill)
If the car does not move, ease the clutch up a tiny bit - the thickness of a pound coin would be enough; this will be enough to get the car moving.
Your instructor will help you develop your clutch control with exercises on both level roads and slight gradients.
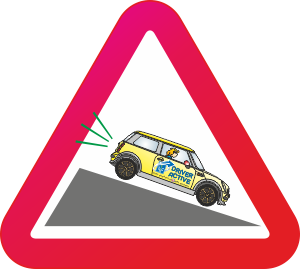
When moving off downhill, gravity provides the power to get the car moving; this makes moving off easier than on a level road, but you have to make sure that you don't roll too quickly, especially on a steep hill.
To keep full control, press the footbrake before you release the handbrake; this will stop the car from rolling away out of control.
In automatics and electric cars, use the footbrake or gas/power pedal to control your speed. When you release the footbrake, the vehicle will start to roll; in a manual car, this is the point at which you bring up the clutch and, if needed, press the gas pedal.
Manual - which gear? Your instructor will discuss which gear to use and will probably give you the opportunity to try 1st and 2nd so that you can work out which feels the best on different hills. It's often better to move off in second gear on some hills because the car will 'roll' up to 2nd gear speed quickly and won't need the power of 1st gear to get started.
The 'Observation' part of the Prepare, Observe, Move routine remains unchanged.
Clutch down
Select the appropriate gear
Automatic*/Hybrid*/Electric: Select Drive
* On a very steep hill it might be appropriate to use 1st or 2nd gear in manual mode in autos and hybrids.
Press the footbrake and keep it pressed to hold the car
Release the handbrake
Make your observation checks
Signal if required
Release the footbrake as required to allow the car to move
Manual car: Bring the clutch up smoothly
Pass the gas/power pedal if/as much as required
When releasing the footbrake, take care. You might need to release the footbrake fully on a slight gradient, but on a steeper hill, it might be necessary to keep some pressure on the footbrake to maintain control as you descend the hill.
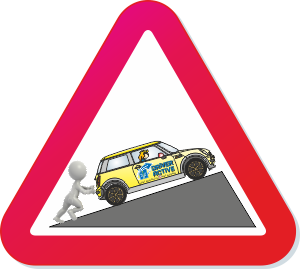
Uphill starts are similar to level starts; however, you have to make the engine work harder. You do this by using more gas.
Because it will take more time to build up speed, you may need a larger gap in the traffic before starting to move than you have been used to so far; this is because the traffic behind will be more likely to catch up with you - and you don't want to hold them up.
Uphill starts require more power to prevent the engine from stalling.
When you feel the clutch bite, press the accelerator a bit harder than on a level road and then release the clutch just a fraction more - this will prevent the danger of rolling backwards.
After releasing the handbrake, apply a little more power to move off and bring the clutch pedal up fully.
The handbrake trick:
The simple trick is to use the handbrake as a 'safety lever' to prevent the car from rolling back while adjusting your feet. (Cars with a conventional manual handbrake lever.)
When new drivers have a problem starting on hills, it is usually because of the fear of rolling back. If the car rolls, even a little bit, they 'panic' and start tap dancing with the pedals!
When you follow the method below, you will only adjust your feet on the pedals when the car is safely secured with the handbrake - get it right, and it's impossible to roll back.
Method:
Start by preparing the car by pressing the gas pedal and bringing the clutch to the biting point. Now keep your feet still!
Make your observation checks, then release the handbrake gently - no more than a few millimetres. If the car starts to move (back or forward) keep your feet still and pull the handbrake back on again.
Re-adjust your feet while the car is secure, double-check that the road is still clear, and try again. Repeat this until you have full control.
By following the simple steps above, you will feel secure in the knowledge that you can't roll back more than a couple of centimetres at the very most; with practise you will find that you soon get the right 'feel' for the clutch every single time that you move off on a hill.
Note: Some manual cars have systems called 'brake assist' or 'hill start assist' (usually with electronic handbrakes) - these make starting on a hill much easier. Your driving instructor/supervisor will explain more about hoe to use these systems if they are fitted to the car that you are learning in.
In automatic and electric cars, hill starts are the same as level starts - the only difference is that you might need more power.
Note that some automatics can roll back when the handbrake is released - if this is the case in your car, press the gas pedal slightly before releasing the handbrake.
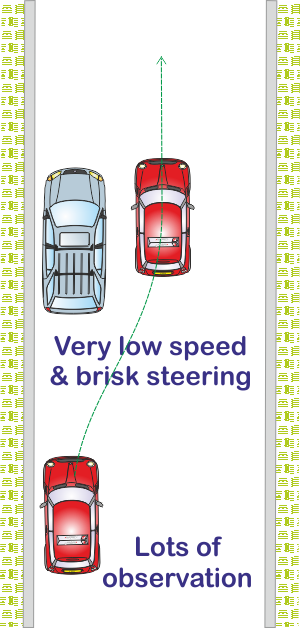
The examiner might ask you to do this manoeuvre on your driving test. But that isn't the main reason for learning it. You'll often have to move out from 'tight' situations after you have passed your test.
This exercise requires good clutch-control in a manual car - make sure that you get all the practice you need to develop this skill.
Automatics and electric cars need controlled use of the gas/power to move the car very slowly.
When moving out at an angle, you need to pay particular attention to traffic approaching from the front and behind. From the front because you may swing into its path, from behind because you will be moving out slowly, other cars will catch up quickly.
It is also good to look around at least twice as you move to double-check that there is enough time to move out safely.
You'll need to use all of the slow control skills you've been learning to complete this manoeuvre safely coupled with brisk, positive steering.
In addition to completing this manoeuvre on a level road, it is also a good idea to practise it on both uphill and downhill gradients.
Start from a parked position about one car length behind a parked vehicle
Complete your POM routine, steering briskly to the right as you move very slowly around the parked car
As part of your observation, take a second glance back as soon as you have started steering
Manual car: Maintain clutch-control until you are clear of the parked car and have straightened the steering
Click here to complete the quiz for this lesson
(The page will open in a new window/tab)
You will find references for the answers in this lesson.
You can check your answers as you go along, or complete the full quiz before checking.
Leaving the check to the end is a good way to test yourself.
When you check or review your answers you will get a brief explanation of the answer.
Good Luck!